Technical Note #1501
Manual Installation of Windows 95's Dial-Up Networking
| Application affected: | Windows | Date Created: | 09/06/96 |
| Version Number: | 95 | Last Modified: | 09/06/96 |
| File Date(s): | All | Created By: | Mike Rimov |
| Type of Note: | Guide | Additional Info: | . |
Keywords: DUN Dial-Up Networking Win95 Windows 95 modem
Summary: In a few cases, it will not be possible for Highway 101 to automatically install and configure Windows 95's Dial-Up Networking software for you. For example, you may be on a network, which would require some special configuration unique to your site.
For this reason, we have listed below the steps necessary to manually install Dial-Up Networking yourself.
Details:
Manual installation of Dial-up Networking to prepare your machine for Internet Access
1. Click on the ![]() Menu
Menu
2. Click on the Settings Menu
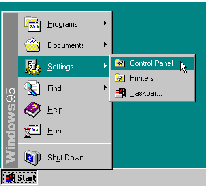
Figure C-1: Displaying the Settings Sub-Menu
3. Select Control Panel
4. Double-click on the icon labeled Network
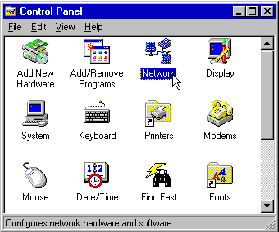
Figure C-2: The Control Panel Icons
5. Figure C-3 shows a list of installed network components at the top of the window. If your list does not include a "Dial-Up Adapter" like the one shown in the figure, simply click on the Add Button.
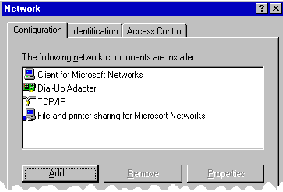
Figure C-3: Network Dialog with Installed Network Components
6. Select Adapter and click Add.
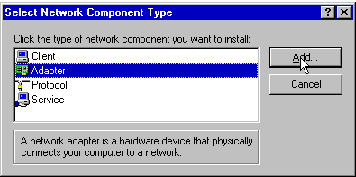
Figure C-4: Add Component Type Dialog Box
7. The window shown in Figure C-5 allows you to select Microsoft's Dial-Up Adapter. You will need to scroll down the window on the left side until you see "Microsoft" and click on it.
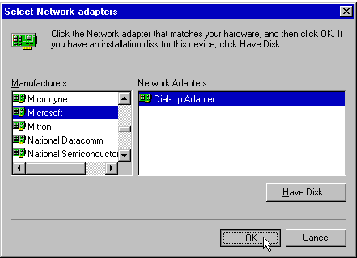
Figure C-5: Select Network Adapters Window
8. When you have selected "Microsoft", the window will look like the one shown in Figure C-5.
Simply click on the Dial-Up Adapter, and then click on the OK button.
9. Next, you will be prompted to insert your Windows 95 CD or Diskettes as shown in figure C-6.

Figure C-6: Request for Windows 95 System Disks
10. After some of the required components have been installed, you will be returned to the window shown in Figure C-3. You will need to click on the "Add…" button again.
11. This time you'll want to choose "Protocol".
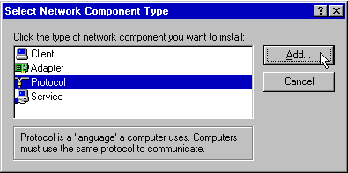
Figure C-7: Add Component Type Dialog Box
12. Again, you'll need to select Microsoft on the Left side of the dialog box (as shown in Figure C-8), and on the right side select TCP/IP. Click OK when you are ready to continue.
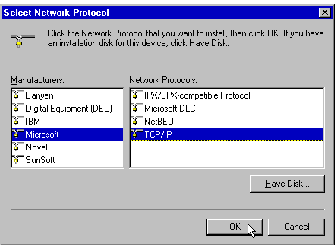
Figure C-8: Select Network Protocols Window
13. If "Client for Microsoft Networks" appears among the "Network Components Installed"
dialog box (as seen in Figure C-3), you can skip to step 17 now.
14. If "Client for Microsoft Networks" is not listed from the previous step, click on the Add button
(as seen in Figure C-3).
15. Select "Client" from the window shown in Figure C-9, and click "Add…".

Figure C-9: Select Network Component Type Window
16. You will want to select "Microsoft" on the left hand side of the window (as shown in Figure C-10), and "Client for Microsoft Networks" on the right. Click OK to continue.

Figure C-10: Select Network Client Window
17. You should now have a window similar to the one shown in Figure C-3. If there is something missing, simply retrace your steps by returning to step number 1.
Return to Tech Corner